MISCHievOUS PUP
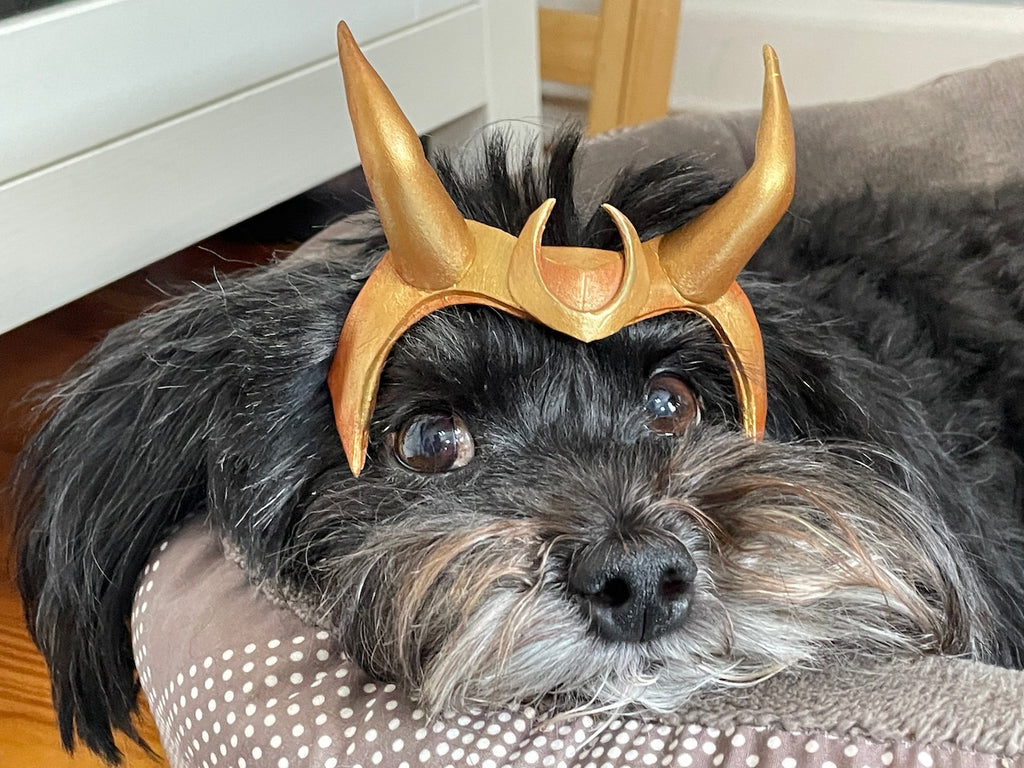
I am so in love with the new "Loki" TV series, and when I saw alligator Loki, I thought "how cute would Wozzy (my dog) look with horns?" So I made some! Here, you'll find a tutorial and the template that I designed.
I hope you enjoy making this project and using it as a photo prop. :)
I want to see your adorable pet pics! Please tag me with a photo of your pet on Instagram! @TechnoChic ❤️


Loki Horns for Pets Tutorial Video:
Step 1: Download & Print the Template
*You may need to resize the template to fit your pet. Measure the distance between your pet's eyes and make sure they fit within the facepiece. If not, increase or decrease the scale of the print to make it the appropriate size.
This template works great with 2mm foam for my very small dog (10 lbs). If you increase the template size a lot, you may also want to increase the width of the foam. (And if you find a combination/size that works, please let me know so that I can add it as a suggestion here!)


Step 2: Cut Out the Horns
- Staple the template to the foam so that it doesn't move around while cutting.
- Using your sharpest pair of scissors, cut the template slowly.
- As you are nearing the point of the horns, rotate your scissors away from the horn as you cut to remove more material from the underside. This will allow the horns to taper more at the ends. You can see how the edge is angled in the second photo.


Step 3: Cut Out the Other Shapes, Focusing on the Details!
- Accuracy is key because this template is so small. Cut slowly and hold the template in place as you cut, focusing on the template line.


Step 4: Glue the Horn Edges Together
- Apply rubber cement to the horn edges and let it dry.
- Starting at the base of the horn, align the bottoms and press the edges together, then continue to close the horn up to the tip.
- Squeeze the tip to shape it. You may trim the tip slightly if the point isn't perfect, just make sure the two horns match.


Step 5: Bend Sculpture Wire to Follow the Shape of Piece "A"
- Take a piece of sculpture wire and bend it to the shape of the facepiece.


Step 6: Glue "A" and "B" Together, Aligning the Top
- Add rubber cement to both pieces "A" and "B".
- Place the sculpture wire onto one piece, about 1/4 inch from the edge (and make sure it isn't covering the darts in the facepiece).
- Glue the two together, aligning the top and side edges. Piece "A" and "B" are slightly different - you should see a nice stepped edge on the inside.


Step 7: Remove Excess Glue
- Remove any excess glue.
- At this point, you can adjust any imperfections in the cut and trim any edges to prepare for the next steps.


Step 8: Glue the Darts Together
- Add glue to both sides of the triangular darts and let dry
- Press the darts closed, leaning the facepiece away from the side with the front detail.


Step 9: Shape the Facepiece Into 3D
- With the wire inside, you can start to shape the facepiece into its 3D form.
- Imagine the shape of your pet's face and widen/tighten the sides accordingly.


Step 10: Glue the Embellishments Together As Shown
- The small triangular piece fits inside the shield-shaped piece.
- Add glue to the edges and adhere them together. The result is a slightly 3-dimensional shield.


Step 11: Attach to the Facepiece
- Attach this shield piece to the center of the facepiece, aligning the triangle at the top with the top of the curve.

Step 12: Complete the Tiny Shield With the Small Horns
- Add glue to the back of the tiny horns piece.
- Glue the piece around the shield, aligning the bottom of the horns over the seam at the center bottom of the shield, and covering the edge of the shield to the top. The small horns will stick out above the facepiece.


Step 13: Place Sculpture Wire Inside the Horns
- Place sculpture wire inside the horns to give them the bent shape. You may also fill the horns with some scraps of foam to fill them out and hold the sculpture wire in place.

Step 14: Glue the Horns to the Facepiece As Shown
- Add glue to the bottom edge of the horns.
- Add glue to the facepiece where the darts are.
- Glue the horns in place, aligning the back seam of the horns with the seam of the dart at the top of the facepiece.


Step 15: Add a Wire to the Back With a Scrap of Foam and Glue
- Add a wire that matches your pet's fur to the back of the facepiece as shown. I used a scrap of foam to reinforce the connection.
- You might also use a piece of elastic or another material to keep the horns on top of your pet's head.


Step 16: Test the Horns!
Bend the Wire in the Facepiece to Fit Around Your Pet's Eyes.
- Now is a good time to try them on!
- With the wire inside, manipulate the horns so that they sit comfortably on your pet's head and avoid their eye area. You can bend the wire quite a bit, so spend some time sculpting the piece to make it just right.

Step 17: Paint the Horns, Starting With Brown As a Base.
- Time to paint! I covered the piece in brown first because brown is a more realistic "shadow" of gold than black.
*Side note: My brown paint was a bit gloppy, so I tried adding some Mod Podge to smooth it out. In hindsight, I should have just went out and bought some new paint, as this made it too thick. I made two of these horns, and the one in the hero image and video below is *without* mod podge, and was a more successful paint job).


Step 18: Then, Add Gold Paint on Top.
- Paint it gold!
- I used pure gold where light would hit it. Then, I defined the shadows in the crevices and sides of the horn with a mix of brown and gold paint to make it look more 3D and metallic.


Step 19: Place Your Horns and Take a Pic!
Quick Tip: Loki Variants can be ✨enchanted ✨by a simple belly scratch. :p
Please please please please please! Send me a pic or tag me on Instagram if you make this project! I want to see your pet Loki!
<3 Natasha


Natasha from TechnoChic
on December 22, 2021 11:50
I used standard acrylic paint from the craft store. Look for something with “metallic” in the title for the gold to make it really pop! And, be sure to manipulate it into shape before painting so that it doesn’t crack. :)
Jennifer Duong
on December 22, 2021 11:47
Which kind of paint do you recommend for painting on foam? Thanks!