
I can't wait.
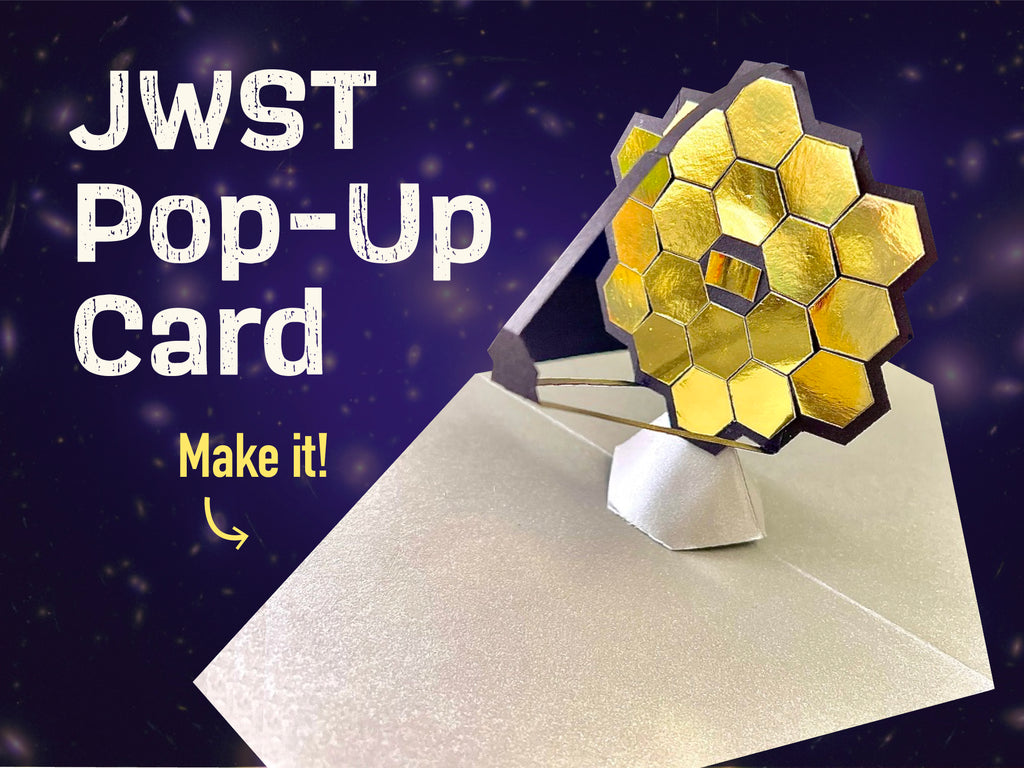
The James Webb Space Telescope will show us more than we ever could have imagined. As a paper engineer, I was inspired by the way that the JWST will unfold in space and I incorporated the movements into this interactive card.
I hope you enjoy making it!
If you haven't already,
Supplies:
- Paper:
- Gold Mirror Paper (1/2 Sheet)
- Black Cardstock Paper (1 sheet)
- Silver Paper (1 sheet)
- 1 A7 Envelope (If desired)
- Glue:
- Tools:
- Paint brush or other tool to apply glue
- Craft Knife and Cutting Mat
- Scissors
- Stapler & Staples
- Bone Folder (or a pen, if you don't have a bone folder)
- Ruler (optional, but very helpful)
- Clothespins (optional, but very helpful)
Instructions
Video Overview:
Step 1: Print the template
Print the template and prepare the supplies.

Step 2: Staple the Gold Mirror Paper to the template
The first step is to cut the hexagonal "mirrors" from the gold mirror paper. You'll only need half of the paper, so save the other half for another project!
Follow these steps closely to make the hexagons fit together accurately:
- Staple the rows of hexagons between the first and second hexagon in each row as shown
- Add more staples at the end of each row, between the second to last, and last hexagons

- Cut along the straight edge of the hexagons to make 3 strips, as shown
- Use scissors to cut each hexagon away from the strip, making sure to go slowly and make accurate cuts. Feel free to add extra staples if it helps with alignment
- Cut out the small rectangle and small circle


Step 3: Transfer the score lines to the black paper
The dashed lines throughout the template are score lines. Staple the black paper to the paper template before you begin.
Use a bone folder and straight edge to imprint the lines into the paper below. If you don't have a bone folder, use a pen to trace the lines- pressing firmly. Look for the smaller dashed lines on the piece with the long sticks.

Step 4: Cut out the interior shapes
Using a craft knife, cut out the interior shapes from the black paper as shown:

Step 5: Cut out the exterior shapes
Using a craft knife or scissors, carefully cut out all of the shapes along the solid black lines.

Step 6: Silver paper support piece
- Staple the template to the silver paper
- Score the dashed lines
- Cut the interior rectangle out using a craft knife

Step 7: Cut it out
Finally, cut out the support piece as shown, adding staples to keep it aligned as needed.


Step 8: Score and cut the sunshield
Score the center line, and mark the center point where indicated with your bone folder or pen. Cut out the sunshield as shown.


Step 9: Fold the flaps
Fold the flaps of the support piece back and forth on the score lines until they fold very easily. Do the same to the center line.

Step 10: Glue the interior flaps, let dry
- Apply glue to the interior flaps (the ones on the inside of the "v").
- Fold the flaps down and close the shape as shown.
- Use clothespins or set the piece under a heavy book to hold it closed as it dries.


Step 11: Fold the center pole piece
This black rectangle will become the center pole that holds up the mirror.
- Apply glue to the one side of the piece as shown


- Fold the outer flaps in (the outer flaps are, in fact, less wide than the two interior columns)
- Be sure that you had cut the small solid line near the pole piece's flaps
- Apply glue to the interior of the piece, except on the flaps, as shown


- Fold the piece closed
- Use clothespins or a book to hold the piece closed as it dries

Step 12: Glue the back square
Apply glue to the back square, and glue it to the back of the mirror support piece as shown.


Step 13: Glue the sensor
Turn the mirror support piece over and glue the small gold rectangle inside the rectangular hole as shown.


Step 14: Glue the alignment hexagon
Glue the alignment hexagon over the rectangle as shown. This will be a guideline for placing the mirrored hexagons in an upcoming step.

Step 15: Prepare the sunshield
Fold the sunshield along the score line as shown.


Step 16: Glue the center pole piece
- Apply glue to the bottom of the pole piece's flaps, and glue it on top of the center mark as shown. Make sure the pole is exactly in the middle valley of the centerfold of the card.


Step 17: Add the support piece
- Fold the bottom flaps on the support piece inwards
- Apply glue to the bottom of the flaps as shown:

- Slide the support piece over the center pole through the rectangular hole in the middle
- Align the edge of the support piece with the edge of the center pole's flap, about 3/8 inch from the center of the card.
- With the support piece in place, close the card to glue both flaps equidistant from the centerfold of the card
- Use clothespins to hold the card closed while it dries


Step 18: Glue the center mirrors
Glue the first 4 mirrors in a vertical row using the alignment hexagon as your guide. The mirrors should sit flush against each other, and will have a black border around the edge of the entire shape. The mirrors in other rows have special instructions, so only glue the first 4 before reading on.


Step 19: Glue the edge mirrors
- For the remaining mirrors, only apply glue to the area shown below (not where the "x" is)
- Fold the mirror support piece along the score lines as shown
- Glue the mirrors so that the glue-less section goes over the edge - this way the shape will still open and close without getting glued open


Step 20: Glue the arm
- Glue the small circular gold mirror in place as shown, on the same side as the other gold mirrors

-
Fold the arm along the score lines at the edge of the mirror support piece and the triangular piece
- Fold the score line at the end of the arm, and glue it to the opposite side of the mirror support piece, at the center top as shown
- Don't fold the middle score line just yet!


Step 21: Prepare the arm to fold flat
- Fold the bottom of the arm upwards until it sits flat on top of the mirrors as shown
- Continue to guide the paper over the edge, but don't crease it just yet -


Crease the paper when it has been bent all the way down and lays flat on the back, like this:

Step 22: Glue the mirror to the center pole
- Apply glue to the top 1.5 inches of the pole, as shown
- Open the card, and position the mirror so that it is just below the edge of the card
- Make sure the arm is out of the way, and close the card to adhere the pole to the back of the mirror


Step 23: Prepare for launch!
Fold the mirrors closed and guide the arm flat behind the assembly, then close the card.

Step 24: The assembly is complete!
The finished build should look like this:


Step 25: Add a sentiment and give the gift of geek!
Choose your favorite from the sentiments page and glue it on (or write in your own). The card fits in a standard A7 envelope.
SEND IT TO SPACE!


I hope you enjoyed this tutorial! Please share your creation and tag me! @TechnoChic